Component Interfaces - Part 2 - Calling from ExceltoCI Utility
This article is in continuation of a previous article "Component Interfaces – Part 1 – Calling from Peoplecode in Application Engine". Peoplesoft has delivered a utility called EXCELTOCI utility which is used to update data from excel file and calling Component Interface to perform all the business logic on the data before updating peoplesoft database.
Instead of recreating another set of objects for use here, we will utilize some of the objects developed in previous article. The objects, from previous article, that will be utilized here are:
The records PS_AJ_TABLE_TYPES, PS_AJ_MAP_XLAT_TBL.
The pages AJ_TABLE_TYPES, AJ_MAP_XLAT_TBL.
The component AJ_MAP_XLAT_TBL and its registration (including Portal Registries).
Data populated in tables PS_IBU_GROUP_INV and PS_AJ_TABLE_TYPES.
The tested component interface AJ_MAP_XLAT_TBL_CI.
The example has been created and tested on the following software environment:
Peoplesoft Application: FSCM 9.2
Peoplesoft Peopletools: 8.53.02
Peoplesoft Virtual Machine Image id: FSCMDB-85308-PI004
Database: Oracle 11.2.0
MS Office Professional 2010
Assumptions:
a) The objects listed above and created in previous article (up to Component Interface) are available for reuse.
b) The prerequisites for using ExceltoCI utility are met.
We will be logged in as VP1 so we do not have to spend too much time in security. Security administration in not the focus here.
The major steps will be:
1) Loading sample data using SQL and On-line to review the component.
2) Granting Access to the WEBLIB_SOAPTOCI iScript.
3) Enabling the Developer Menu in Microsoft Excel 2007 and Later Versions.
4) Enabling Macros in Microsoft Excel.
5) Updating and configuring our cloned ExceltoCI utility for our Component Interface.
6) Create a new template from delivered ExceltoCI utility.
7) Process all records using Component Interface.
1) Loading sample data using SQL and On-line to review the component.
Let us clear the data from table PS_AJ_MAP_XLAT_TBL and reload sample data using the following data using following SQLs.
INSERT INTO PS_AJ_MAP_XLAT_TBL VALUES ('CA90701','PAYMENT_TERMS','CIA',' ',' ','SRC CIA','ADV','PSFT ADV',SYSDATE,'AGGARWAA');
INSERT INTO PS_AJ_MAP_XLAT_TBL VALUES ('CA90701','PAYMENT_TERMS','COD',' ',' ','SRC COD','COD','PSFT COD',SYSDATE,'AGGARWAA');
INSERT INTO PS_AJ_MAP_XLAT_TBL VALUES ('CA90701','PAYMENT_TERMS','DA',' ',' ','SRC DA','30day DA30','PSFT 30day DA30',SYSDATE,'AGGARWAA');
INSERT INTO PS_AJ_MAP_XLAT_TBL VALUES ('CA90701','PAYMENT_TERMS','EOM45',' ',' ','SRC EOM45','M45','PSFT M45',SYSDATE,'AGGARWAA');
INSERT INTO PS_AJ_MAP_XLAT_TBL VALUES ('CA90701','PAYMENT_TERMS','EOM75',' ',' ','SRC EOM75','M75','PSFT M75',SYSDATE,'AGGARWAA');
INSERT INTO PS_AJ_MAP_XLAT_TBL VALUES ('CA90701','PAYMENT_TERMS','LC90',' ',' ','SRC LC90','LC90','PSFT LC90',SYSDATE,'AGGARWAA');
INSERT INTO PS_AJ_MAP_XLAT_TBL VALUES ('CA90701','PAYMENT_TERMS','M45',' ',' ','SRC M45','M45','PSFT M45',SYSDATE,'AGGARWAA');
INSERT INTO PS_AJ_MAP_XLAT_TBL VALUES ('CA90701','PAYMENT_TERMS','M75',' ',' ','SRC M75','M75','PSFT M75',SYSDATE,'AGGARWAA');
INSERT INTO PS_AJ_MAP_XLAT_TBL VALUES ('CA90701','PAYMENT_TERMS','N00',' ',' ','SRC N00','N00','PSFT N00',SYSDATE,'AGGARWAA');
INSERT INTO PS_AJ_MAP_XLAT_TBL VALUES ('CA90701','PAYMENT_TERMS','N10',' ',' ','SRC N10','N30','PSFT N30',SYSDATE,'AGGARWAA');
IN the PIA, navigate to the component AJ_MAP_XLAT_TBL and go to the tab Map-Xlated Items.

Let us add one row (11th row) as shown below and save.

select * from PS_AJ_MAP_XLAT_TBL WHERE IBU_GROUP = 'CA90701' AND TABLE_TYPE = 'PAYMENT TERMS';

We have 11 rows now. Like in the previous article, the use of this 11th row for N1M serves two purposes. First, it shows the component and all its parts are working fine. Second, this very row exists in our sample data so we will be able to see what happens when a row fails validation. We will not delete this row now and let ExceltoCI utility fail later.
2) Granting Access to the WEBLIB_SOAPTOCI iScript.
The user connecting with ExcelToCI must have access to the WEBLIB_SOAPTOCI web library through an appropriate Role and permission list combination.
If the user does not have access, the following error message will appear.
"The response text is not valid XML. Login data cleared"
Following SQL will list the Users who have access to load data using ExceltoCI utility.
SELECT DISTINCT R.ROLEUSER AS USER_IDS
FROM PSROLEUSER R, PSROLECLASS C, PSAUTHWEBLIBVW P
WHERE R.ROLENAME = C.ROLENAME
AND P.CLASSID = C.CLASSID
AND P.MENUNAME = 'WEBLIB_SOAPTOCI';
Following SQL will get a list of permission lists with access to the web library.
select distinct CLASSID from PSAUTHWEBLIBVW where MENUNAME = 'WEBLIB_SOAPTOCI';

3) Enabling the Developer Menu in Microsoft Excel 2007 and Later Versions.
In Microsoft Excel 2007 and later versions the Developer menu is not automatically enabled. For using Excel to Component Interface utility, we need access to some of the features accessed via the Developer menu. If Developer Menu is not visible, go to Excel options and enable Developer tab.


4) Enabling Macros in Microsoft Excel.
The Excel to Component Interface utility relies on macros therefore macros must be enabled in Microsoft Excel for the utility to work. When a Microsoft Excel spreadsheet is opened, the system displays a dialog box asking you to select whether to enable macros on the spreadsheet. Select Enable Macros so that the macros delivered with the Excel to Component Interface utility can function.
To ensure that the macros are available to run, you must set the security level in Microsoft Excel to allow macros to open. The ExceltoCI utility can be found in <PS_HOME>\excel folder with the filename of ExcelToCI2007.xlsm. Open the Excel to Component Interface utility, select Tools, Macros, select Security, Select either Medium or Low to enable the macros and finally select OK. Save the file as Excel Macro-enabled Work book with the name ExcelToCI_AJ_MAP_XLAT.xlsm in the same folder. The delivered file will remain unaltered.
5) Updating and configuring our cloned ExceltoCI utility for our Component Interface.
The ExcelToCI_AJ_MAP_XLAT.xlsm has five worksheets.
The first sheet is Cover-sheet. No change is required here.
The second sheet is Connect-Information.
Once we are logged on to PIA, the URL looks like
http://fscm92.ps.com:8000/psp/ps/EMPLOYEE/ERP/h/?tab=DEFAULT
So the connection information will be filled as

The Action will be filled in when the Template is created.
6) Create a new template from delivered ExceltoCI utility.
The third sheet is Template. On this sheet, click the New Template button. The Login dialog box for the Excel-to-Component Interface utility is displayed.

We will enter the information as shown below and click on OK button.

The structure of the component interface is retrieved from the database when a new template is built. All of the fields that are exposed through the component interface appear on the template page.
The new template macro builds the parent-child relationship within Microsoft Excel based upon the component interface scroll-level definition. The system adds a new row for each scroll level.

Let us click on Select-All-Input-Cells. Click on last two columns LASTUPDDTTM and LASTUPDOPRID and click on Deselect-Input-Cell.
7) Process all records using Component Interface.
The fourth sheet is Data-Input. Click on New-Data-Input button and click yes on the warning dialog box.

The control will go to Data-Input sheet and the following blank sheet will be presented.

Enter the following data.

Since the parent UNIT_GROUP = CA90701 and TABLE_TYPE = PAYMENT_TERMS exists already in the Table types table PS_AJ_TABLE_TYPES, we are adding new children to an existing parent. We need to use the Component interface in Update mode. So we will change the Action on Connection sheet from CREATE to UPDATE.

Let us save the excel file at this moment.
While on the Data-Input sheet, click on the Stage-Data-For-Submission button. Control will move to the fifth sheet Staging-and-Submission and the following staged data will be displayed.

Click on the Submit-Data button. The following log-on dialog box appears.

Enter the userid and password and click on OK button.
Once the ExceltoCI processing is done, the display changes as follows.

The 3rd record failed as expected. Other records succeeded. The exceltoCI utility continued after the failed record. All other records are processed fine.
Click on Post-Results button. The control moves to Data-Input sheet.

Let us review the data loaded.

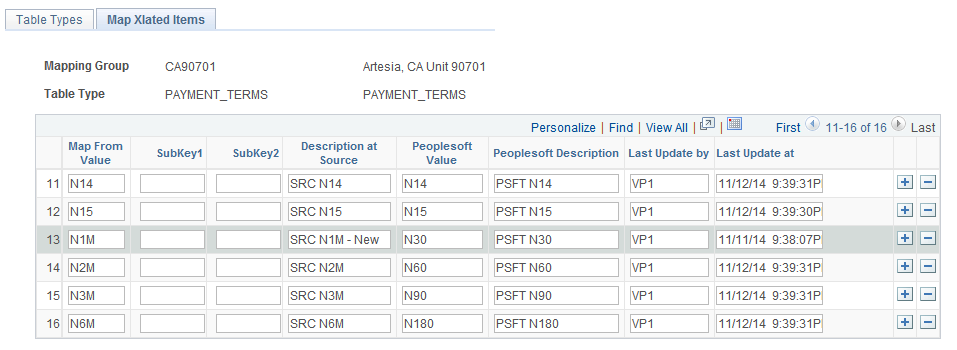
Let see the data on the web page as well.

Let us save the excel file at this stage. We will change the Description-From on 3rd row.

We will also change the Action to UpdateData.


Click on the Submit-Data button. Enter the userid and password and click on OK button. Once the ExceltoCI processing is done, the display changes as follows.

The record succeeded. Let see the data on the web page.
That is it for ExceltoCI utility.
Comments
Post a Comment